
As a fairly new user of UNRAID, one of the main objectives for me was to set up Plex on UNRAID. As I would have access to large scalable storage, it only made sense to exploit the hardware that is already in place. In conjunction with the video, this how I set mine up and I have been very happy with it. The steps in this post correlate closely to the video linked at the bottom of this post so please take a look at it.
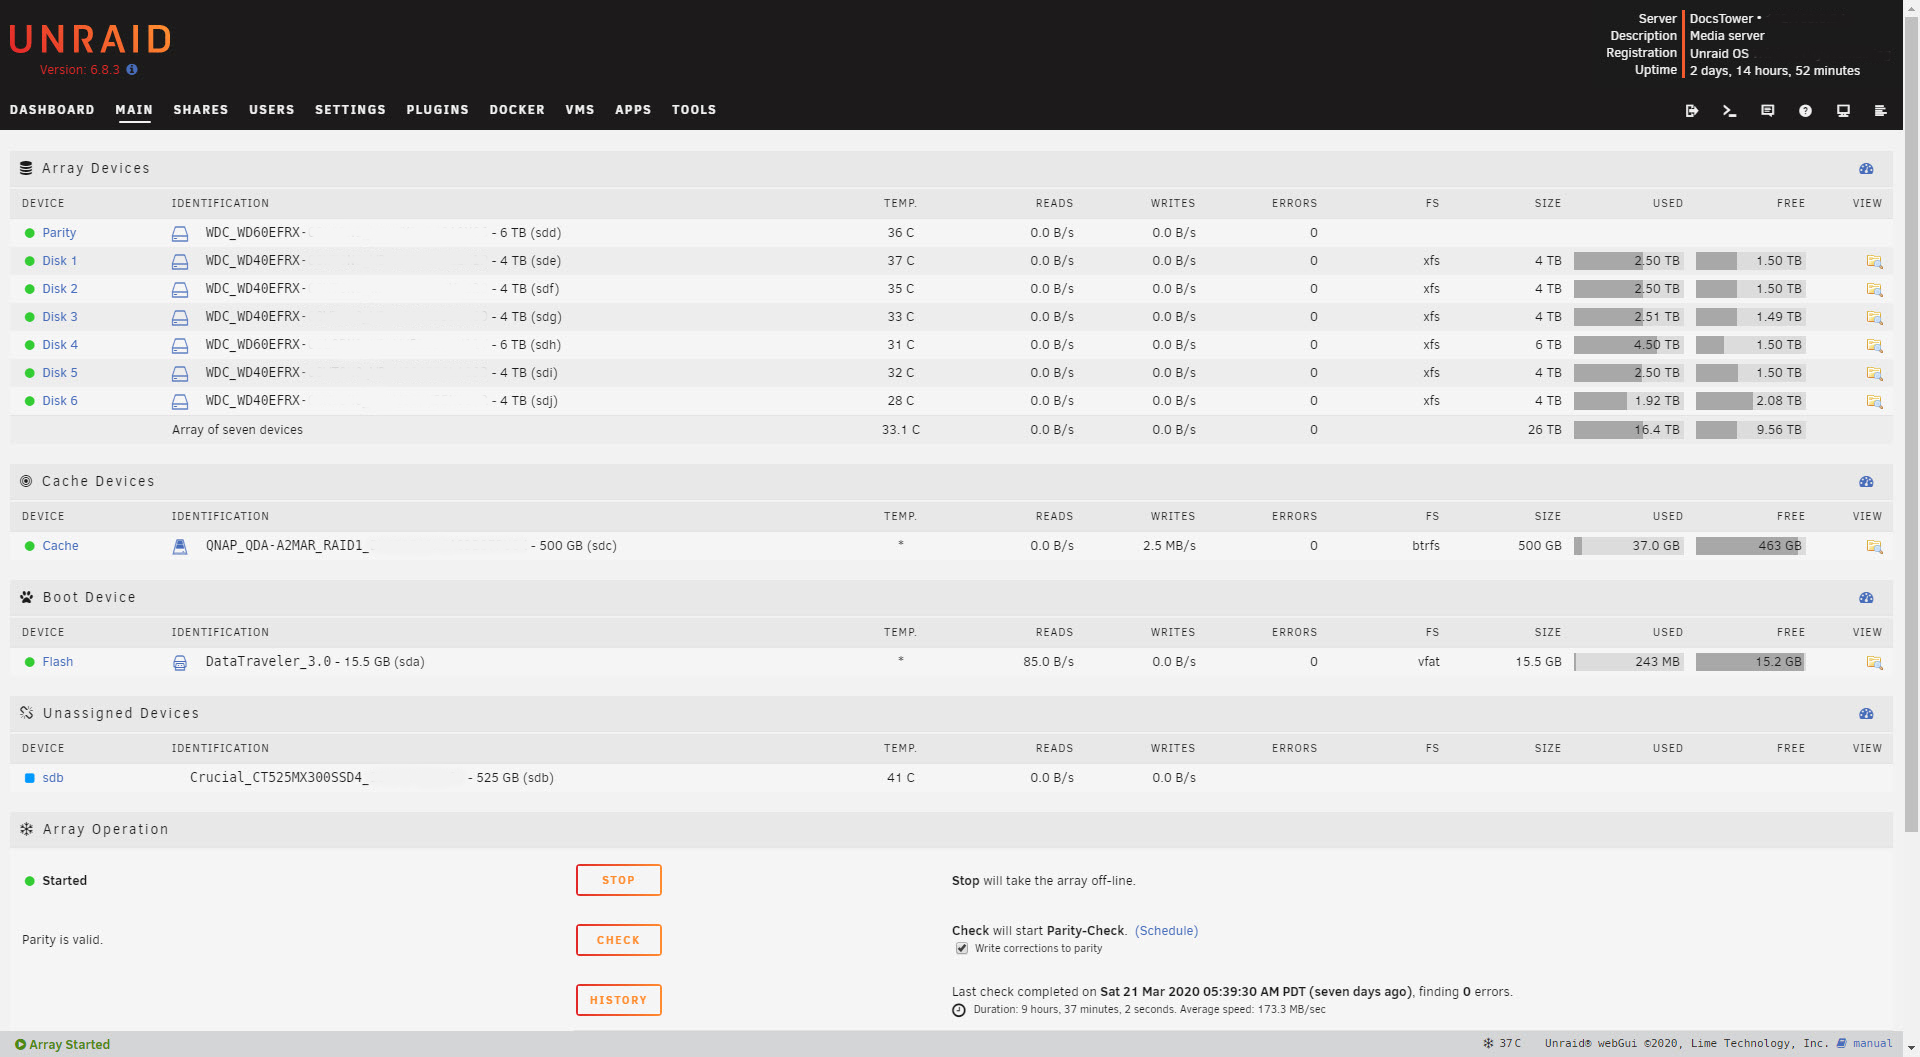
Before we get into how I set it up, I want to give you a quick overview of the hardware I am using for my UNRAID Server. It is nothing very exotic and I built this from some extra hardware I had.
-
Hardware that was used:
- Hard Drives: I used 7 drives, 2 WD Red 6T (1 as a Parity drive, 1 as a data drive), plus 5 WD Red 4T for data. All the data drives are running on a Highpoint 2720SG in pass-through mode (non-raid). Though these have a Marvel controller that do not always play well with UNRAID, I am not using Vt-d and have not had any issues with this controller.
- For a cache drive, I used a QNAP QDA-A2MAR in a RAID 1 configuration as a cache drive so that there is redundancy while data is on the cache drive. This drive is attached to one of the SATA controllers connectors on my motherboard. I did a separate video on this device (see below).
- For CPU I am using a low-end Core I3-8100 that supports Quick Sync with an Asus Maximus Hero Motherboard that I had laying around. Since completing the video, I have upgraded the CPU to a I5-9400 6-Core so that I could have more breathing when experimenting with VM on UNRAID. The video and all testing were done with the I3-8100.
- For a network card, I am using a Sonnet 10 GbE card Plugged into my QNAP 10 Gbe switch. I did a separate video on the Sonnet (see video below).
- To give you an idea of the performance, here is a quick copy of a movie to the server. This is obviously going to the CACHE drive but it will give you an incredible boost in file copying.
-
Plex setup and configuration
- Assuming you have UNRAID running and working smoothly the following steps mirror what I did in the video.
- Download the plugin to the community applications if you have not already done so
- Once you have installed the Community Application, search the community apps and download the new Plex APP (Docker Container). For this video, I have used the official Plex app.
- Configuration
- The first thing I like to do is to create a “high level” SHARE that you will use as the main folder to store your content. I want to do this first as it makes it easier to configure.
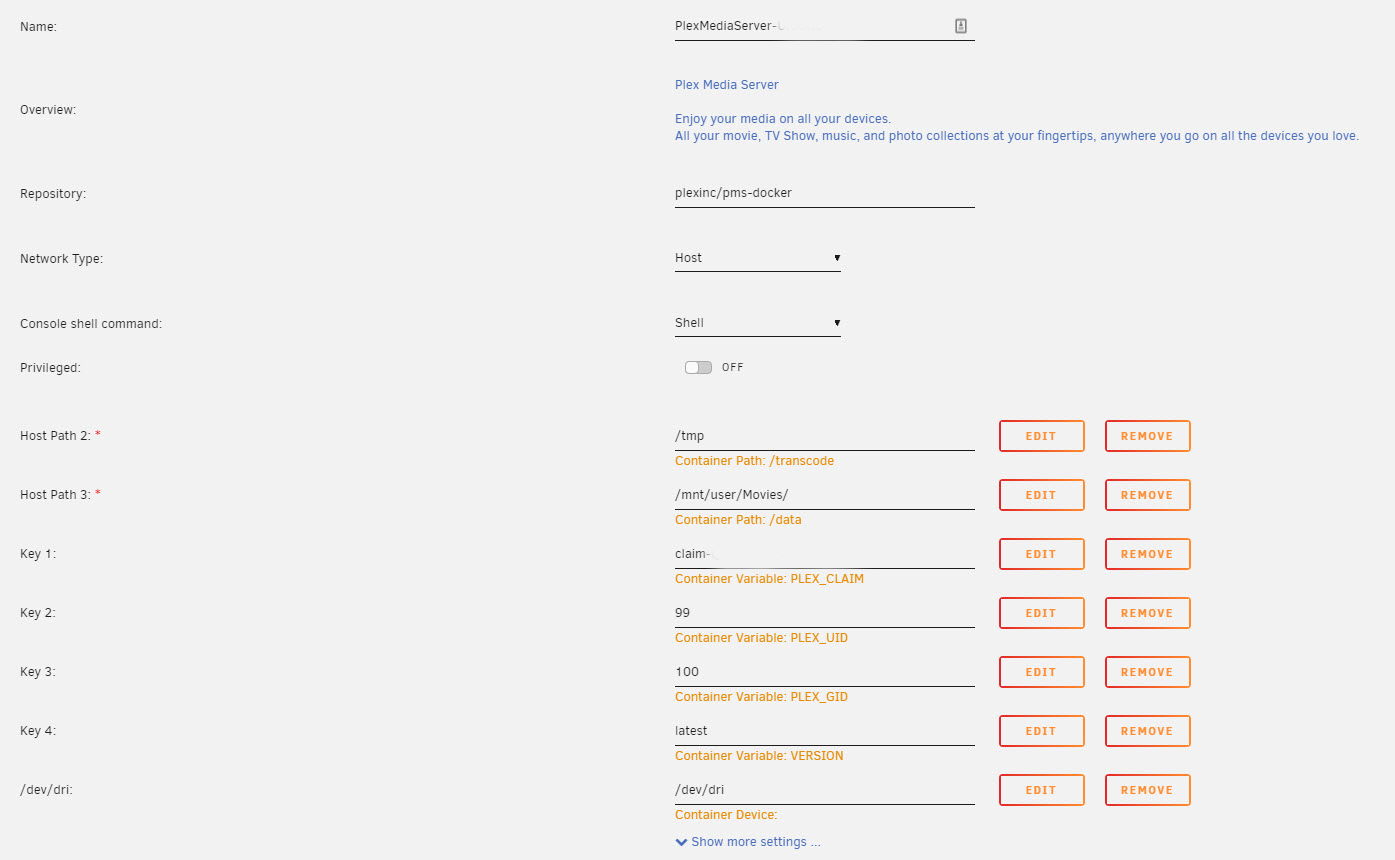
- Next, we want to configure the Plex App itself. Below are the settings that I used.
- Configure Host Path 2: /tmp This sets up transcoding in RAM which I think is the best way to go. Optionally, you can enter the desired container pathname, this is a docker volume mapping that you are associating a container path with a physical share.
- Next Configure Host Path 3: /mnt/user/Movies (or whatever SHARE you created).
- Copy the link and get the Claim code for the plex server. IF you do not have a Plex account you will have the opportunity to create one.
- That should be it for now. We will come back to set up hardware decoding once we verify things are working.
-
Plex Server setup
- Now that you have it installed, click on the icon and select the WebUI and let’s go to Plex to set up some basic configuration in Plex. If your Plex server has not yet been started, click and select start and then click on the WebUI.
- Under “Settings” go to the REMOTE ACCESS menu on the left and first make sure that remote access is enabled. Note: You are going to need a port forwarding rule in your router to test this. If you have more than one Plex Server, then you will have to customize the port number otherwise leave the default.
- Set your MAX upload speed so that you do not consume all your bandwidth. 5-10 seems to be the best for me but that will depend on your service speeds. It states maximum upload but I usually put what I am comfortable allocating.
- Limit the Bitrate to what you want to stream and save your changes.
- Go to the NETWORK section and set “secure connections” to required. This may give you trouble accessing plex from the Docker WebUI, but it should work fine accessing from the web site. If you have too much trouble, you can set it back to “PREFERED” as this impacts only internal access.
- Next Goto the Transcoder section and enable “Hardware acceleration and hardware-accelerated video encoding”. IF you do not see these sections, we will come back after we enable hardware acceleration on the system.
- This is all we need to do now on the setting screen.
- Create at least one Library to get things started and to allow us to test hardware decoding. I suggest using the highest resolution movies you have so we can properly test the transcoding.
-
Hardware acceleration (Quick Sync)
- Assuming you are using a “Quick Sync” compatible CPU (check the intel site for compatible CPUs), we now going to enable hardware transcoding. We will not be discussing AMD or using Graphics Cards for transcoding. In my limited experience, even a low-end CPU like an I3-8100 does a great job at decoding an uncompressed Blue Ray to a mobile device and consumes only about 15-20% in CPU resources per stream. You can use a better CPU but this should give you a baseline.
- Go to the terminal window of UNRAID (upper right side of your main window) and type the following to verify your configuration in the terminal window.
- cd /dev/dri (enter)
ls (enter)
- IF you see this: card0 and renderD128 in the terminal you are good to go, however most likely it will be blank and NOT return this value or give you back an error message.
- Assuming you did not get the correct response, type the following in the terminal window:
- modprobe i915 (enter)
- cd /dev/dri (enter)
- ls (enter)
- You should now see “card0 and renderD128” which means you are good to go.
- There are two more things to do.
- First, we have to give permissions to the device.
- To do this go back to the terminal and type: chmod -R 777 /dev/dri (enter)
- Head over to the Docker Tab,
- Click on your Plex container and select edit.
- Scroll to the bottom click on Add another Path, Port, Variable
- Select “Device” from the drop-down Enter the following:
- Name: /dev/dri
Value: /dev/dri - Click Save followed by Apply.
- Log Back into Plex and navigate to Settings > Transcoder. Click on the button to SHOW ADVANCED
- Enable “Use hardware acceleration when available” if you were not able to do it before or verify that it is now checked.
- First, we have to give permissions to the device.
- Assuming that it is working as should, you now should be transcoding using hardware. Verify this in your Plex Dashboard. You should see a “HW” next to the moving that is streaming when you view the details.
- One last step. Assuming everything has worked as planned so far, the settings that we just did are NOT saved and will not be there after you reboot your system. To solve that problem we need to save these commands to a GO file so it will be executed every time you reboot the server.
- To do this:
- Go back to the terminal and type the following:
- nano /boot/config/go (enter)
- Add the following Lines:
- modprobe i915 (enter)
chmod -R 777 /dev/dri (enter) - Hit CTRL X, type (Y) and press ENTER to save your go file. If you do not press enter your file will not be saved.
- modprobe i915 (enter)
- Go back to the terminal and type the following:
- These commands should now execute on reboot.
- Add more media and enjoy your new plex server running on UNRAID